Arrow

Posts on this site are never sponsored.

How to access “most viewed pages” data using the Google Analytics API 3.0 and PHP

If you are running Google Analytics on your site, you can use its API to read visitor data and display the information. Here is a quick framework how-to on using the API to get the data to create a “most viewed” widget based on the pages that get the most pageviews. The data is accessed periodically in the background from a script on your website’s server.

Version 3.0 of the Google Analytics API 3.0 implements the OAuth 2.0 protocol. Among the benefits of OAuth are the fact that applications don’t have to store user credential information, and that users can revoke an application’s permissions at any time. However, the OAuth authorization process can be a bit more involved compared to some other API approaches. Also, the Google documentation is a bit light in terms of summarizing the process for server-side data access.

This how-to will use PHP to make the server-side calls to the Google Analytics API, which returns information in the JSON format. The code examples assume that you have cURL for PHP installed, and that you are using PHP 5.2.0 or later in order to use the json_decode function to parse the Google responses.

The setup steps are as follows: We will first set up the application in the Google API console. Then we’ll authorize the application with a Google account that has access to your site’s data. Using the resulting authorization code, we’ll request a refresh token from Google.

From there, you can build the application part: The refresh token is used to get access tokens that are finally used to actually read the data from Google. The details of implementing the data for the widget will be left up to you.

Google API console setup

Log in to the Google API console with a Google account. Note that the account that you log in with here does not need to be the same account that has access to your site’s data.

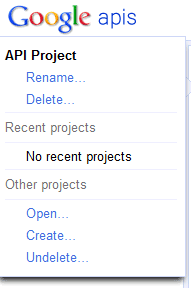
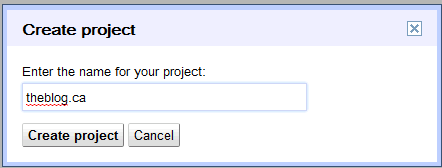
At the top of the left menu, create a new API project in the dropdown list:

Create new API project

Name the API project

Once your new project is created, select the “Services” page from the left menu, and turn on the Google Analytics API:

Turn on the Analytics API

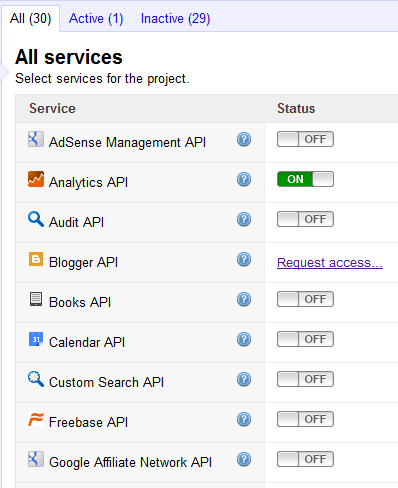
Note that there are per-day query limits for each API service.

Select the “API Access” page from the left menu, then create a web application client.

Create a new client ID

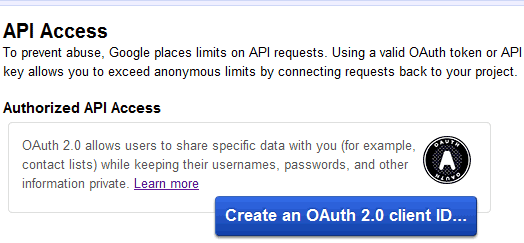
The name of the web application client will be displayed to the user (you) later when you authorize the application.

Client ID details

Client ID application type

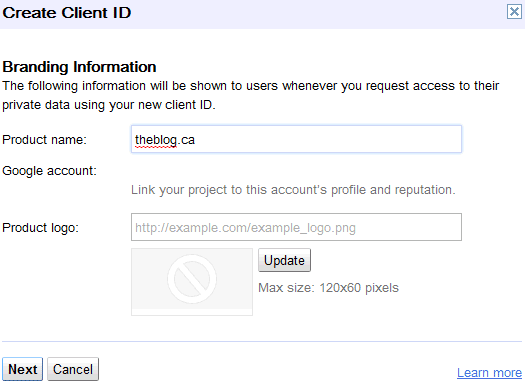
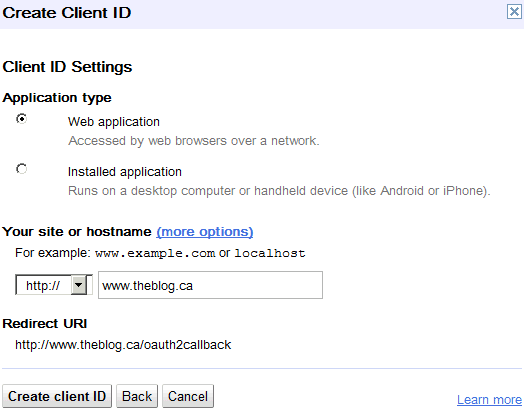
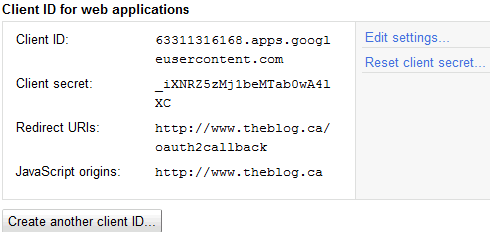
You will need both the client ID and client secret later, used in a PHP script accessible at the redirect URI, which you can rename to add the “.php” suffix as necessary.

Client ID, client secret

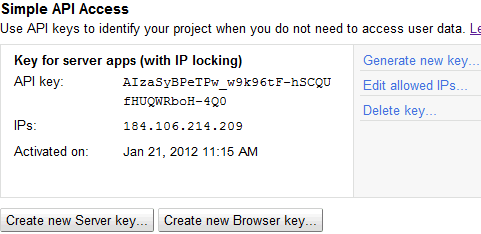
If you need to access data server-side when an authorized user is not logged in, the web application client is not sufficient. You also have to create a server API key, limited to the IP address(es) of your server(s):

New server key

Authorize the application

Next, you’ll have to authorize the application to access your Google Analytics data. Remember that the account that created the API application does not have to be the same account that has access to your site’s data.

To prompt the user (you) to authorize your application, you have to build the authorization URL. First, however, we should build a very basic script at the configured redirect URI. The first iteration of the script has this code at http://www.theblog.ca/oauth2callback.php:

<?php
    var_dump( $_REQUEST );
?>

This is simply going to output to your screen the raw data that is being sent to the script via either POST or GET parameters. It is not the complete script yet, but will be used for illustrative purposes.

To build the authorization URL (which is a set of GET parameters at the URL https://accounts.google.com/o/oauth2/auth), you’ll need the following information, which is as follows for our example application:

  • Callback URL: http://www.theblog.ca/oauth2callback.php
  • Client ID: 63311316168.apps.googleusercontent.com
  • Client secret: _iXNRZ5zMj1beMTab0wA4lXC

You will also need to specify a response type (always “code”), the type of access you are requesting (“offline” since we are accessing the data in the background without user intervention), and a “scope” specific to Google Analytics. See the Google API OAuth 2.0 documentation for information on the URL parameters and the resulting response.

For our example application, the authorization URL is:

https://accounts.google.com/o/oauth2/auth?response_type=code&client_id=63311316168.apps.googleusercontent.com
&redirect_uri=http://www.theblog.ca/oauth2callback.php&access_type=offline
&scope=https://www.googleapis.com/auth/analytics.readonly

Get the permanent refresh token

When you access the authorization URL, it should prompt the user (you) to allow the application to access the site data. Once you click the authorization button, you should be redirected to your authorization URL, which you will discover has the “code” GET parameter. You will have to use the value of that GET parameter to ask Google for the refresh token.

Our example uses cURL to build the refresh token request, whose URL uses a similar format to the authorization URL, posting a set of fields to https://accounts.google.com/o/oauth2/auth. According to the Google API OAuth 2.0 documentation, you’ll need the client ID, client secret, and redirect URI information from before, as well as the “code” and an extra field “grant_type”, which is always “authorization_code”.

In oauth2callback.php, use the following code:

<?php
if( isset( $_GET['code'] ) )
{
    $ch = curl_init();
    $timeout = 5;
    curl_setopt( $ch, CURLOPT_URL, 'https://accounts.google.com/o/oauth2/token' );
    curl_setopt( $ch, CURLOPT_POST, 1);
    curl_setopt( $ch, CURLOPT_POSTFIELDS, 'code=' . $_GET['code']. '&client_id=63311316168.apps.googleusercontent.com&client_secret=_iXNRZ5zMj1beMTab0wA4lXC&redirect_uri=http://www.theblog.ca/oauth2callback.php&grant_type=authorization_code');
    curl_setopt( $ch, CURLOPT_RETURNTRANSFER,1 );
    curl_setopt( $ch, CURLOPT_CONNECTTIMEOUT, $timeout );
    $data = curl_exec( $ch );
    curl_close( $ch );
    $result = json_decode( $data, true );
    var_dump( $result );
}
else
{
    var_dump( $_REQUEST, true );
}
?>

Note that we are once again using a quick and dirty “var_dump” to output the returned information on the screen. If you visit the same authorization URL in your browser once again, you should get redirected to the same URL as before, but this time showing the response from the extra request for the refresh token. This response should, of course, contain the refresh token.

One extra note: to see which applications you’ve authorized under a Google account, you can go to this URL: https://accounts.google.com/IssuedAuthSubTokens, where you can also revoke access, forcing the application(s) to ask for your authorization again.

Use the refresh token and access the data

The refresh token is the most important piece of information, as it is essentially the permanent key that you need to access the Google Analytics data. (It is permanent as long as the user account that authorized the application does not revoke access.) The more accurate description is that the refresh token is used to get a time-limited access token, and that the access token is used along with the API key you had set up, valid only for specific IP addresses, to access the data.

In our example, the refresh token is:
1/7DRzjcqm-ypH9By1FrY3T-l_oSW3KdklC0LJuZLk5Q0

The following example script is a framework for what you would use with your website, and assumes that you are running it periodically, about once an hour, and therefore you need to ask for a new access token every time. A Google Analytics access token typically has an expiry of just over 1 hour, and thus you can use it for more than 1 request within that hour.

The script gets the top 10 pages based on pageviews for the past 1 day.

<?php

// First, ask for an access token using the refresh token
$ch = curl_init();
$timeout = 5;
curl_setopt( $ch, CURLOPT_URL, 'https://accounts.google.com/o/oauth2/token' );
curl_setopt( $ch, CURLOPT_POST, 1);
curl_setopt( $ch, CURLOPT_POSTFIELDS, 'refresh_token=1/7DRzjcqm-ypH9By1FrY3T-l_oSW3KdklC0LJuZLk5Q0&client_id=63311316168.apps.googleusercontent.com&client_secret=_iXNRZ5zMj1beMTab0wA4lXC&grant_type=refresh_token');
curl_setopt( $ch, CURLOPT_RETURNTRANSFER,1 );
curl_setopt( $ch, CURLOPT_CONNECTTIMEOUT, $timeout );
$data = curl_exec( $ch );
curl_close( $ch );
$result = json_decode( $data, true );

/*
You should get a response like this in the result:
{
  "access_token":"1/fFBGRNJru1FQd44AzqT3Zg",
  "expires_in":3920,
  "token_type":"Bearer",
}

Then, you can use that access token to build queries (see http://code.google.com/apis/analytics/docs/gdata/gdataExplorer.html or http://code.google.com/apis/explorer/#_s=analytics&_v=v3 for examples):
*/

if( isset( $result['access_token'] ) )
{
    // Look up only the last day of visits
    $endDate = date( 'Y-m-d' );
    $startDate = date( 'Y-m-d', strtotime( '-1 day' ) );
    /*
        "ids" value comes from this URL in the last portion of the URL, after the "p": https://www.google.com/analytics/web/#dashboard/default/a381759w192893p9122283/
        Or use http://code.google.com/apis/analytics/docs/gdata/gdataExplorer.html to show the GA ID for each your Analytics accounts
        "key" is the API key that you'd set up in the Google APIs console, restricted to certain IP addresses
    */
    $url = 'https://www.googleapis.com/analytics/v3/data/ga?' . 'key=AIzaSyDyWgfb45VYfVYdVnmpH4JZCCRNas5P0SE&ids=ga:9122283&start-date=' . $startDate . '&end-date=' . $endDate . '&metrics=ga:pageviews&sort=-ga:pageviews&dimensions=ga:pagePath&max-results=10';
    $ch = curl_init();
    $timeout = 5;
    curl_setopt( $ch, CURLOPT_URL, $url );
    curl_setopt( $ch, CURLOPT_HTTPHEADER, array( 'Authorization: Bearer ' . $result['access_token'] ) );
    curl_setopt( $ch, CURLOPT_RETURNTRANSFER,1 );
    curl_setopt( $ch, CURLOPT_CONNECTTIMEOUT, $timeout );
    $data = curl_exec( $ch );
    curl_close( $ch );
    $mostViewedRaw = json_decode( $data, true );
    var_dump( $mostViewedRaw );
}
?>

From here, it is up to you to use the returned data in ways that best suit your needs and application. For example, for performance reasons and API call limitations, you might want to run the script only about once an hour, and store the results in a database table or a data structure specific to your content management system. You might also want to do some extra filtering on the Google Analytics results to only display certain types of pages (omitting the front page, for example). Note that the resulting Google Analytics data is simply output to the screen in our example so that you can see its structure and determine how to use it to suit your needs.

Dairy-free, soy-free yogurt: cultured coconut milk

If you’re allergic to cow milk or you are lactose intolerant, you find that there are many soy-based milk alternatives. However, if you’re also allergic to soy or just scared of genetically-modified soybeans, it gets much more difficult depending on what type of food you’re looking for and what nutrients you are trying to get. Yogurt is one such food. A relatively new discovery for me, So Delicious cultured coconut milk (aka yogurt), is worth checking out.

So Delicious cultured coconut milk

The main reasons why I enjoy(ed) cow milk yogurt is that it is a tasty snack, and that it is a good source of calcium. Coconut milk yogurt is tasty (although the coconut taste is definitely apparent) and high in calcium, without triggering the same type of digestion problems.

If you compare the nutrition label to a dairy-based yogurt, you’ll find that they match up quite well, which was very likely a main intention of So Delicious. In the image below, the cow milk yogurt is on the left and the coconut milk yogurt is on the right.

So Delicious cultured coconut milk

Note that it’s not fair to directly compare the fat and sugar values in my example, since the cow milk yogurt example is Méditerranée Lemon Yogurt, which is purposely a thick, rich, and fat yogurt.

For those who are interested, here is the ingredient list for the strawberry variety of the So Delicious coconut milk yogurt:

coconut milk, chicory root extract, strawberries, dried cane syrup, rice starch, pectin, tapioca dextrose, nautral flavour, algin (kelp extract), magnesium phosphate, tricalcium phosphate, locust bean gum, live cultures, citric acid, carrot juice, guar gum, carrageenan, monk fruit extract

Live cultures: L. Bulgaricus, S. Thermophilus, L. Rhamnosus, L. Acidophilus, Bif Bifidum, Bif Animalis

In Metro Vancouver, I found the coconut milk yogurt at Choices Markets and Donald’s Market in these flavours: blueberry, strawberry, vanilla, and plain.

Redirecting users on first login in WordPress

On membership-based WordPress sites and other sites where you want to display a special welcome message or instructions to new users, you can implement some custom login redirect functionality. This functionality would kick in only once (or for the first few logins) per user.

The important elements on the code-side for such functionality is to use the built-in WordPress “login_redirect” filter, and to store information on whether or not the user has gotten the “first login” treatment. There are a couple of possible approaches to store the information, either in a cookie or in the user’s meta information (stored in the WordPress database in the “wp_usermeta” table).

Here is some sample code you can use in your theme’s functions.php file or in a plugin:

Cookie-based solution

// Send new users to a special page
function redirectOnFirstLogin( $redirect_to, $requested_redirect_to, $user )
{
    // URL to redirect to
    $redirect_url = 'http://yoursite.com/firstloginpage';
    // How many times to redirect the user
    $num_redirects = 1;
    // Cookie-based solution: captures users who registered within the last n hours
    // The reason to set it as "last n hours" is so that if a user clears their cookies or logs in with a different browser,
    // they don't get this same redirect treatment long after they're already a registered user
    // 172800 seconds = 48 hours
    $message_period = 172800;

    // If they're on the login page, don't do anything
    if( !isset( $user->user_login ) )
    {
        return $redirect_to;
    }

    $key_name = 'redirect_on_first_login_' . $user->ID;
    
    if( strtotime( $user->user_registered ) > ( time() - $message_period )
        && ( !isset( $_COOKIE[$key_name] ) || intval( $_COOKIE[$key_name] ) < $num_redirects )
      )
    {
        if( isset( $_COOKIE[$key_name] ) )
        {
            $num_redirects = intval( $_COOKIE[$key_name] ) + 1;
        }
        setcookie( $key_name, $num_redirects, time() + $message_period, COOKIEPATH, COOKIE_DOMAIN );
        return $redirect_url;
    }
    else
    {
        return $redirect_to;
    }
}

add_filter( 'login_redirect', 'redirectOnFirstLogin', 10, 3 );

Download the cookie-based redirect on first login plugin

User meta table based solution


// Send new users to a special page
function redirectOnFirstLogin( $redirect_to, $requested_redirect_to, $user )
{
    // URL to redirect to
    $redirect_url = 'http://yoursite.com/firstloginpage';
    // How many times to redirect the user
    $num_redirects = 1;
    // If implementing this on an existing site, this is here so that existing users don't suddenly get the "first login" treatment
    // On a new site, you might remove this setting and the associated check
    // Alternative approach: run a script to assign the "already redirected" property to all existing users
    // Alternative approach: use a date-based check so that all registered users before a certain date are ignored
    // 172800 seconds = 48 hours
    $message_period = 172800;

    // If they're on the login page, don't do anything
    if( !isset( $user->user_login ) )
    {
        return $redirect_to;
    }

    $key_name = 'redirect_on_first_login';
    // Third parameter ensures that the result is a string
    $current_redirect_value = get_user_meta( $user->ID, $key_name, true );
    if( strtotime( $user->user_registered ) > ( time() - $message_period )
        && ( '' == $current_redirect_value || intval( $current_redirect_value ) < $num_redirects )
      )
    {
        if( '' != $current_redirect_value )
        {
            $num_redirects = intval( $current_redirect_value ) + 1;
        }
        update_user_meta( $user->ID, $key_name, $num_redirects );
        return $redirect_url;
    }
    else
    {
        return $redirect_to;
    }
}

add_filter( 'login_redirect', 'redirectOnFirstLogin', 10, 3 );

Download the user-meta based redirect on first login plugin

Some extra notes:

  • The code can be modified so that you don't actually redirect the user anywhere different than normal users, but set the user meta information or cookie and read that data to show a special pop-up or box to the user.
  • WordPress has some default limitations disallowing redirects to URLs outside of your site's domain. If you need to redirect users elsewhere, you'll have to add the URLs to the "allowed redirect" list with code similar to this.
  • If you have more sophisticated login redirect needs, you can adapt the code as an extension to this fully-featured redirect plugin.

How to use custom canonical URLs in WordPress

WordPress has been automatically adding canonical URL tags to individual posts and pages since version 2.3. For many reasons, such as duplicating content across domains, especially when syndicating content, you might want to specify a custom canonical URL for certain posts. For example, you would point the canonical URL to the authoritative original source of a syndicated post.

Here’s a quick and simple, do-it-yourself guide to overriding a canonical URL whenever you make use of a specifically named custom field. As of WordPress 3.3, the default function that handles the canonical URL feature is rel_canonical in wp-includes/link-template.php:

function rel_canonical() {
    if ( !is_singular() )
        return;

    global $wp_the_query;
    if ( !$id = $wp_the_query->get_queried_object_id() )
        return;

    $link = get_permalink( $id );
    echo "<link rel='canonical' href='$link' />\n";
}

To override this function, you have to build your own copy of it in your theme’s functions.php file (or in a plugin):

// A copy of rel_canonical but to allow an override on a custom tag
function rel_canonical_with_custom_tag_override()
{
    if( !is_singular() )
        return;

    global $wp_the_query;
    if( !$id = $wp_the_query->get_queried_object_id() )
        return;

    // check whether the current post has content in the "canonical_url" custom field
    $canonical_url = get_post_meta( $id, 'canonical_url', true );
    if( '' != $canonical_url )
    {
        // trailing slash functions copied from http://core.trac.wordpress.org/attachment/ticket/18660/canonical.6.patch
        $link = user_trailingslashit( trailingslashit( $canonical_url ) );
    }
    else
    {
        $link = get_permalink( $id );
    }
    echo "<link rel='canonical' href='" . esc_url( $link ) . "' />\n";
}

// remove the default WordPress canonical URL function
if( function_exists( 'rel_canonical' ) )
{
    remove_action( 'wp_head', 'rel_canonical' );
}
// replace the default WordPress canonical URL function with your own
add_action( 'wp_head', 'rel_canonical_with_custom_tag_override' );

Then, on any post or page on which you want to override the canonical URL, add a custom field with the name “canonical_url” and the full URL value that you want to use:

Custom field for a canonical URL in WordPress

In the future, there could be a more efficient, “pluggable” way to accomplish this. The current way that WordPress handles this, you could end up with multiple plugins overriding the canonical URL feature, resulting in duplicate or clashing custom functions (as an example, the Simple:Press forum plugin has its own override function). There’s an open ticket on the topic of adding a filter in the rel_canonical function to make this process cleaner. Some of the example code above was taken from a patch in that ticket.

Photos of Trinity Lutheran Church in Delta BC

Here are some pictures of Trinity Lutheran Church at 11040 River Road in Delta BC. Some of the later pictures show the church minimally decorated for a wedding.

See the Trinity Lutheran Church website for more information about the church.

Click on any of the pictures to view a bigger version of them.

Trinity Lutheran Church photo Trinity Lutheran Church photo
Trinity Lutheran Church photo
photo by Rosanna
Trinity Lutheran Church photo
photo by Lyndsay London Photography
Trinity Lutheran Church photo
photo by Lyndsay London Photography
Trinity Lutheran Church photo
photo by Lyndsay London Photography
Trinity Lutheran Church photo
photo by photo by Lyndsay London Photography
Trinity Lutheran Church photo
photo by Lyndsay London Photography
Trinity Lutheran Church photo
photo by Lyndsay London Photography