Windows 7 external hard drive “not initialized”
First published on March 19, 2011
My internal hard drive recently started to make clicking noises, which is often the first sign that it a hard drive is near death. I quickly went out to buy a new internal hard drive, as well as an external USB hard drive enclosure in order to connect the hard drive to the still working computer and transfer all data as soon as possible. Once that was complete, I would just swap in the new hard drive.
For those who are interested, the program I used to successfully copy all my data to the new hard drive is called DriveImage XML. DriveImage XML is free for personal use and enables you to “image” a hard drive even while it is in use running an operating system.
The challenge I had was in getting Windows 7 to actually recognize the external hard drive in the first place. I figured that USB enclosures are “plug and play”, and the USB tray icon verified that:
![]()
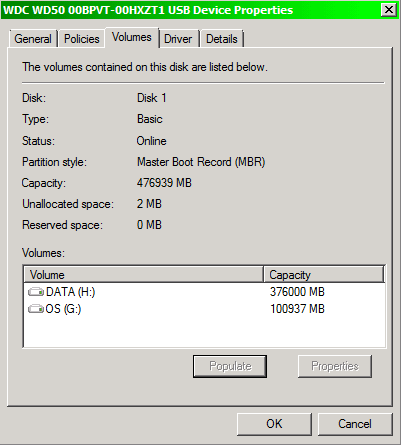
Double-clicking on that icon showed the enclosure device, and it even correctly identified the hard drive itself. But it wasn’t showing up as a drive with a drive letter in Windows Explorer — and as such, no program would be able to recognize it as a drive either. The Volumes tab on the Properties menu for the drive showed its status as “not initialized”.
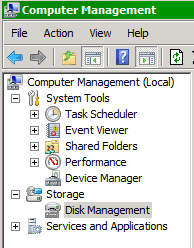
What I’d completely forgotten was that internal drives usually have to be formatted before being used, whether in an enclosure or internal to the computer; this is in contrast to drives that already come advertised as external drives and are usually pre-formatted. And something I learned is that you no longer need a separate formatting or partitioning program such as Partition Magic. (In fact, the built-in tool has been available since Windows XP — it’s been a while since I’d needed to partition a drive!) You can access the Windows 7 partitioning tool “Disk Management” via:
Start Menu > Programs > Administrative Tools > Computer Management
or
Control Panel > Administrative Tools > Computer Management
Then, under “Storage Tools” you should see “Disk Management”:
Once there, you should see your unformatted and unpartitioned drive in the bottom panel. Right-clicking on the unformatted space should bring up a menu where you can create a formatted partition, assign a drive letter to it, and mark it as active to make it bootable. If you are going to have a few partitions on a drive, be sure to only mark one as active / bootable.
The formatting and partitioning process took only a few seconds, and the status for the drive then displayed as “Online”:
 Facebook
 Twitter
 Email this
 keung.biz. Hire my web consulting services at


September 15th, 2012 at 9:23 am
Stefan says:
Great tutorial Peter. It solved the exact problem I was having. Thank you.