Many open source content management systems use TinyMCE for rich text / WYSIWYG editing, including WordPress, Drupal, eZ Publish, Joomla, Alfresco, and more.
Inserting custom layouts in TinyMCE can be accomplished by using the custom block feature, or “custom tag” in eZ Publish.
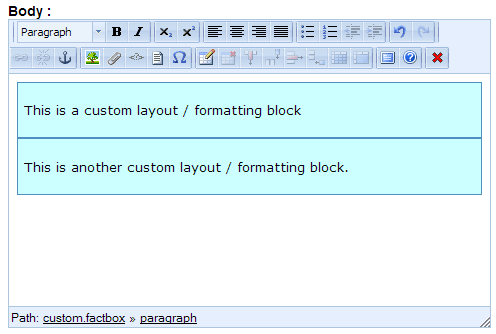
The problem with the custom block is that if you have multiple custom blocks adjacent to each other, nested custom blocks, or a custom block at the end of the rich text content, your cursor gets “stuck” at the bottom of the custom block. Pressing “Enter” on your keyboard will create a new line or paragraph within a custom block but you cannot create a new line or paragraph outside of the custom block without editing the source HTML or XML.
For eZ Publish, my company wrote a small TinyMCE plugin that will create a new line or paragraph directly after a custom block when “CTRL+Enter” is pressed on the keyboard.
Most of the plugin code is standard and well-documented functionality on how to create a TinyMCE plugin and generally manipulate HTML using JavaScript. The most challenging part was getting the code right to simply place the cursor at the beginning of the new paragraph (so that the user can continue to type and enter content there).
The most popular solution I found when searching was as follows, but it did not work in Chrome and other WebKit browsers: the cursor would simply stay within the custom block.
# ed is the TinyMCE editor instance, or tinymce.Editor
ed.selection.select( newParagraph);
ed.selection.collapse( false );
Other suggested alternatives that I could find were ed.focus(); and ed.selection.setNode( newParagraph );. I even tried a standard jQuery function $( ‘#target’ ).mousemove();
In the end, the solution that works in all standard browsers is to use the very aptly named setCursorLocation function, which appears to be documented only for TinyMCE 4.x, but also exists and works for TinyMCE 3.x.
I’ve pasted the code snippet below, and you can also see the full plugin file here.
ed.onKeyDown.add( function( ed, e )
{
    // Capture CTRL+Enter
    if( ( ( e.keyCode == 13 ) || ( e.keyCode == 10 ) ) && ( e.ctrlKey == true ) )
    {
        var dom = ed.dom;

        var parents = dom.getParents( ed.selection.getNode() );
        for( var i=0; i < parents.length; i++ )
        {
            currentNode = parents[i];
            // Insert empty paragraph at the end of the parent of the closest custom tag
            if( currentNode.nodeName == 'DIV' && currentNode.getAttribute( 'type' ) == 'custom' )
            {
                // dom.insertAfter doesn't work reliably
                var uniqueID = dom.uniqueId();
                jQuery( '<p id="' + uniqueID + '"><br /></p>' ).insertAfter( currentNode );

                // Move to the new node
                var newParagraph = dom.select( 'p#' + uniqueID )[0];
                ed.selection.setCursorLocation( newParagraph );

                // Don't create an extra paragraph
                e.preventDefault();
                break;
            }
        }
    }
});


 keung.biz. Hire my web consulting services at

