Arrow

Posts on this site are never sponsored.

How to back up your site cheaply with Amazon S3 and s3sync

The two main parts of WordPress and other popular CMS-powered websites are the database and the files. Your web host might keep regular backups of all elements of your site, but the unfortunate thing is that sometimes when your server is down, that is the most difficult time to access your host’s backups (as I discovered with a shared host). So it’s good to consider your own backup solutions.

If you have a MySQL database, a simple mysqldump command can save the database as a file and you can potentially e-mail it to yourself if it’s small enough. With or without the dumped database file, you then have to back up the rest of the files. Dropbox is a creative solution, but an easier and more direct solution is to use Amazon’s Simple Storage Service, otherwise known as Amazon S3. S3 is a service that’s part of the much hyped cloud computing, a land of seemingly infinite data and virtualized resources. Amazon S3 is cheap, well-documented, robust, easy-to-use, and there are many good scripts to interface with S3. It is more than just a good backup option, but for this post I’ll only talk about it within the context of backups.

Amazon S3’s costs are pay-per-use / pay-as-you-go and are split into a few categories:

  • Storage: starting at $0.15 per gigabyte
  • Data transfer in: Free until November 1, 2010; usually starting at $0.10 per GB
  • Data transfer out: starting at $0.15 per GB
  • Put and similar requests: 0.01 per 1,000 requests (if you have lots of files this will be the initial input)

Account management in Amazon breaks this down really well into minute details. My blog is relatively small, as I’ve only accumulated about 100mb of files in 4 years and the database is less than 2mb compressed. My monthly cost for daily and weekly backups is less than 20 cents.

Here are a few ways to get the most out of using Amazon S3 for backups:

  • Back up only what you need to. Most CMSs let you place all your modifications in one or only a few places. In the case of WordPress, if your entire site is contained in plugins, themes, and uploads, you might only need to back up the wp-content/ folder, since you could restore the rest of the site from a downloaded instance of WordPress.
  • Look into some of S3’s extra features, such as versioning and access control by IP as discussed in its FAQ
  • Although Amazon S3 claims to be designed to provide “99.999999999% durability and 99.99% availability of objects over a given year”, it could still fail at the same time that your server fails. To mitigate this already-small risk, you could back up to multiple S3 regions, or look at a supplementary backup service such as Rackspace Cloud Files
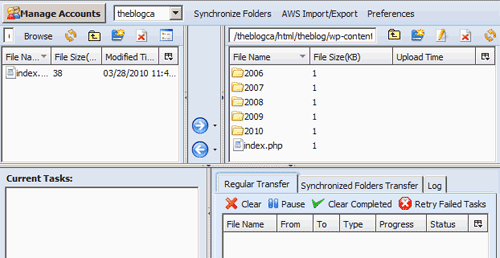
  • To actually access the backed up files, you can use the web-based AWS Management Console to view and download files, make them publicly accessible if needed, create “buckets” (top-level folders, which you can store in different physical locations). One of the more useful tools is a Firefox plugin called S3Fox Organizer, which lets you do much of the same stuff in a familiar explorer-like, two-panel interface (where you can drag-and-drop between your local file system on the left and the remote files on the right):

Firefox plugin for browsing your Amazon S3 buckets

If you need a step-by-step process to using Amazon S3 starting with the sign-up process, check out this post. Below are my notes on how to use the free s3sync and s3fs tools for the actual backup process. Both assume that you’ve already created a bucket via the AWS Management Console or S3Fox Organizer, although you can also use both tools to create buckets.

s3sync

s3sync is a script written in Ruby. Ruby is usually installed on Linux servers and is easy to install if needed.

There are 3 main steps to start using s3sync.

Download and extract the script

You can currently download the latest version of s3sync at:
http://s3.amazonaws.com/ServEdge_pub/s3sync/s3sync.tar.gz

Then, you can extract the file through your control panel or with a simple tar command:

tar -zxf s3sync.tar.gz

Create a configuration file

You’ll need to make a copy of the included s3config.yml.example file. It is very simple and has only two required lines:

aws_access_key_id: your_access_key_id
aws_secret_access_key: your_secret_access_key

You can get both the access key ID and the secret access key on your account when you sign in to Amazon Web Services. Go to Account > Security Credentials.

As for where to place the configuration file, take a look at s3config.rb. Line 15 shows:

confpath = ["#{ENV['S3CONF']}", "#{ENV['HOME']}/.s3conf", "/etc/s3conf"]

So you can either place the s3config.yml file in a self-defined environmental variable (if you have command line access); or in your user’s home directory (usually /home/yourusername/.s3conf/s3config.yml) or in etc/s3conf/s3config.yml. If all else fails, you can just edit s3config.rb and hardcode a path!

Run the script

Before you set up your full backup, you can test that your credentials and connection are working properly by listing the buckets on your account. The command is simply:

./s3cmd.rb listbuckets

Note that s3cmd.rb needs to have executable permissions. If you don’t have command line / shell access to your server, you likely have access to a control panel where you can set up a cron job to execute s3cmd.rb. Just make sure that the cron job either refers to the full path where s3cmd.rb sits, or that it first changes directory (cd) into the folder to which you’ve extracted s3sync.

If all is well, you can then run the full backup script and then set up a cron job to back up your files daily and weekly (or at whatever frequency you’d like).

/path/to/s3sync/s3sync.rb -r /path/to/your/site theblog:daily

The command would back up your site to an existing bucket “theblog” under a sub-folder “daily”.

s3sync can also do many other Amazon S3 management tasks. Check the well-detailed README file for more information.

s3fs

s3fs is a simple solution for VPS and dedicated servers that enables you to mount an Amazon S3 bucket via a local FUSE file system. You can thus access your backup and sync it more or less locally.

(A quick note to VPS users — first, make sure that FUSE has been installed on the hardware node of the VPS setup! Your hosting company will have to do this for you. Otherwise, you might struggle with errors that seem to be file permission related (“fuse: failed to open /dev/fuse: Permission denied”) but that are in fact not simply chmod, chown, or user group fixable!)

If needed, install the fuse, fuse-devel, and curl-devel packages on your server. If you’re on Red Hat, Fedora, or CentOS, you can make use of yum:

yum install fuse
yum install fuse-devel
yum install curl-devel

Then, download and extract the latest s3fs source files from the s3fs website. You’ll have to compile the source, but that’s usually a simple “make -f Makefile” command. Then, move the s3fs binary into /usr/bin and you’re ready to mount the Amazon S3 bucket!

/usr/bin/s3fs name_of_bucket -o accessKeyId=aaaa -o secretAccessKey=aaaa /mount_path

As noted in the above s3sync notes, you can get both the access key ID and the secret access key on your account when you sign in to Amazon Web Services. Go to Account > Security Credentials.

You can use the friendly rsync command to produce daily, weekly, or other frequency of backups:

rsync -av --delete /path/to/your/site/ /mount_path/daily

WIND Mobile review: somewhat unique, somewhat the same

For the first time since possibly Fido (before it was acquired by Rogers), Canada has a new major cellular phone network operator: WIND Mobile. While many new wireless companies have formed over the past decade, such as Virgin Mobile, Koodo Mobile, and Speak Out Wireless, they are all either owned by one of the major operators (Telus, Bell, or Rogers) or they lease the usage of the major operators’ networks. WIND Mobile, on the other hand, actually operates its own network, and thus has the ability to be much more of a so-called game changer.

In many ways, WIND is different, for better or for worse! With WIND’s recent Vancouver launch, my curiosity has been piqued. Here are my thoughts and breakdowns of some of WIND’s major details. My goal is not to give a comprehensive review, but rather to share some details to think about when considering WIND.

No contract, almost

WIND’s offerings are contract-free, so figuring out how much the commitment really costs is straightforward… almost. You can cancel starting the next month and you can move on. And you can choose to go prepaid or post-paid on any of its monthly plans. (But don’t confuse prepaid with a true pay-as-you-go arrangement — WIND’s plans are still monthly plans.)

The catch, at least for now, is that you almost certainly will have to buy a WIND phone, and if you decide to leave WIND, you’ll have to have stuck around for 3 months before the phone is useful on other carriers. More details in the next point…

SIMs and phones

First of all, WIND will sell you a SIM card separately, which you could insert into an unlocked phone. So you can technically bring an unlocked phone to use with WIND. In the future this could be handy, but at the moment it is likely not so useful. Unfortunately, WIND uses the 1700 Mhz frequency band (also referred to as AWS), which is only used by some T-Mobile phones and the smaller Canadian wireless company Mobilicity. Up until now, most unlockable phones in North America are GSM phones, running on the 850 Mhz and/or 1900 Mhz frequency bands.

Once you’ve been with WIND for 6 months, the phone is quite useful because you can ask WIND to help you unlock it for a $10 fee. WIND phones are 5-band phones, supporting the AWS band, the North American GSM bands, and the 900 / 1800 Mhz bands used in many other parts of the world, such as Europe. This is unlike some other Canadian carriers such as Koodo, whose phones will only work when you’re using Koodo, leaving you semi-stuck if you want to leave but don’t want to waste your phone. So the selection of WIND-compatible phones is somewhat limited, but WIND phones are compatible on a lot of other networks (even if they were probably forced to do this even be relevant)!

I’m not an avid cell phone model follower, so I cannot comment on the merits of the phones that WIND offers. You definitely don’t have your choice of all of the latest trends, though.

Yak bundles

WIND’s parent company is Globalive, which also runs Yak. Yak is best known for its long distance plans, but it also offers high speed Internet and home phone service. WIND’s website does not advertise this, but you can bundle some or all of its offerings in what they call Yak Paks. Pricing is competitive, but make sure you research reviews of Yak’s services and also decide whether you really want to put all your eggs in one basket!

Coverage, “zones”, and plans

WIND’s plans are good for the medium-to-heavy talk and text users. If you’re a light user (less than 100 minutes per month) look for something like pay-as-you-go with Speak Out Wireless. Data / web browsing is a standard add-on. It’s great to see that caller ID, call forwarding, call conferencing, and call waiting are included in all plans. Voicemail, though, is an extra $5 per month unless you’re on the highest plan. In keeping with the long-overdue trend in Canada, there are no extra 911 or system access fees with WIND.

An important and unique concept with WIND is the differentiation between a “WIND Zone” (aka local or almost-local) and an “AWAY Zone” (aka roaming). If you’re in one of the cities where WIND has built a network, you’re in a WIND Zone. Depending on your plan, you get province-wide calls from a WIND Zone; plus possibly unlimited incoming calls when in a WIND Zone; all the way up to unlimited Canada-wide calling from any WIND Zone. Because WIND’s network is relatively new (so far they’re in Toronto, Vancouver, Calgary, Edmonton, and Ottawa), this will be more of a perk as it grows.

AWAY Zone calls, including all incoming calls in an AWAY zone, are extra even on the most expensive plan. Their AWAY zone coverage map in Canada looks like Rogers’ coverage: in other words, coverage is as good as the other wireless providers but it’s obviously costing WIND to use the other networks. Other carriers have the benefit of a bigger network. At least with WIND you know you’re paying for what costs them and not paying so much when it’s cheaper for them… it’s semi-transparent. The within-Canada “roaming” rate actually isn’t bad (25 cents a minute extra for calls), and an unexpected advantage is that the US roaming rates are the same. WIND seems to beat Telus’, Bell’s, and Rogers’ US roaming rates by a large amount.

You can also roam and call internationally, although like any other Canadian carrier, be prepared to pay exorbitant amounts. If you want to make calls when you’re outside of Canada and the US, it’s usually best to get a SIM card from the local area. And if you regularly make calls internationally from Canada or from the US, get a calling card, use a landline, or use Skype or another VoIP option.

There is unlimited WIND-to-WIND calling (when in a WIND Zone) on every plan. This is consistent with WIND’s apparent approach of letting you benefit from their low marginal costs when you’re using their network — artificial charging of intra-network long distance calls is just not as bad with WIND.

Promotions

WIND usually has a promo going on. Some of its promotions have included $150 in credit when porting in a number; a free month of service for every new customer you refer; and 50% off plans for the first 6 months. Unlike the established carriers, these are deals worth being called deals, but remember to consider the regular price of the service once your promo has expired!

Also, if you’re an existing customer of another Canadian wireless company and you’re looking for a good deal, remember to try calling your current carrier’s retentions program!

Community

I can’t speak for WIND’s customer service, but they do have a community section on their website where you can post ideas and grievances, and share stories with other users. It’s one step below an actual forum or more fully-featured message board, which is likely a deliberate marketing move.

No WIND zone in Quebec :(

While you can still roam on WIND Mobile in Quebec, WIND won’t have an official presence in that province unless it partners with Videotron in the future.

Conclusion

Combine the fact that there are so many mobile company options these days, with people’s ever-changing and ever-evolving mobile needs, it’s quite tough to give an overall and/or standalone assessment of any company or its individual plans. WIND Mobile certainly has some unique offerings. It’ll be around for a while and needs to grow its network and phone selection, and see how its initial offerings go. And that’s the extent of what I can conclude. An effective search for a new provider starts with defining your own unique needs, and then seeing what’s out there — WIND Mobile is possibly a good option!

Echoclean shampoo review: fewer chemicals, more natural, scalp feels better

As a guy, my shampoo needs are few. Shampoo should make my hair feel clean and not have any bad side effects.

For years, I’d been using shampoo like Herbal Essences and Garnier Fructis.

Garnier Fructis shampoo bottle

Most mainstream shampoos have the following characteristics:

  • relatively cheap
  • wide distribution, due to good business relationship with major grocery stores and drugstores
  • thick and frothy so you think your hair is getting clean
  • smells good
  • lots of marketing effort, so that even if you’re a guy and the ads don’t directly appeal to you, those brands of shampoo are top-of-mind

For years, I’d have some hair loss in the morning (as everybody does), and I’d had somewhat dry skin and a dry scalp. Although my hair is still as thick and plentiful as ever, I started to think that Garnier Fructis had been making my head itchier than it should be, and that the number of hairs falling out in the morning if I were to shake my hands through my hair was more than usual.

An inspection of the ingredient list shocked me:

Garnier Fructis shampoo ingredients

What are all of these long and complicated chemical names?

Sodium laureth sulfate, disodium cocoamphodiacetate, glycol distearate, sodium laureth-8 sulfate, pyrus malus, hexylene glycol… hydroxypropyl guar hydroxypropyltrimonium chloride, polyquaternium-30… dmdm hydantoin, niacinamide…

A quick Google search yielded some toxicity concerns. Now, I know that if we looked close enough, most products are bad for us in some way. But I figured, there must be less irritating shampoos with ingredients that are less mysterious.

I ended up trying Echoclean shampoo sold at Choices Markets.

Echoclean shampoo bottle

Echoclean is rather watery, doesn’t foam as much, and is not even close to as thick as other shampoos I’ve used — that took some getting used to. It smells good, but not overwhelmingly amazing. The important thing is that my head and hair feel good after using it, my scalp doesn’t feel dried out, and my hair isn’t falling out so much in the morning. My hair feels clean, and I don’t need a sensual smell experience or a lots of foaming to get that feeling.

The ingredient list is short and non-offensive:

Echoclean shampoo ingredients

This list is mostly intended to create a good, natural shampoo rather than the illusion of a good shampoo:

purified water, coconut oil, palm oil and other plant oil derived surfactants, food grade preservatives, natural colorants, peach extracts

Echoclean’s regular price for a 500mL bottle was about $6 (although it was on sale for $4), compared to Garnier Fructis’ $4 regular price for a 384mL bottle. So even when comparing the normal prices, Echoclean isn’t overly expensive, although I’m certainly willing to pay a small premium if it’s better for my hair and potentially the environment (with its claims of “all-natural” and “biodegradable”).

While I’m recommending Echoclean, it’s not the only alternative shampoo solution. It’s not available everywhere, it’s not perfect, and its ingredient list could be more closely scrutinized. And you always have to beware of greenwashing. Compared to Garnier Fructis and similar shampoos, though, Echoclean is a comfortable step forward.

Start your quest for a happier scalp by looking for less shiny, less marketed shampoos that don’t have such a crazy list of ingredients.

After a few months of using Echoclean, I decided to try Garnier Fructis again, just once. The itch, dandruff, and hair loss it produced was worse than before, presumably because my head had been enjoying its detoxified state for too long! Echoclean is my shampoo of choice for now!

Installing the Subversion client on a CentOS WHM / cPanel VPS

If you’re semi-familiar with CentOS (a type of Linux operating system), you probably know about the package installer yum. When it’s working great, it not only installs and updates packages but also takes care of dependencies.

Installing a Subversion (SVN) client on a CentOS server should be as simple as running the command “yum install subversion”. Unfortunately, I recently ran into a problem on a VPS (Virtual Private Server) hosting account where that simple yum command yielded the error:

Error: Missing Dependency: perl(URI) >= 1.17 is needed by package subversion

A few of the typical troubleshooting steps might be to try to run “yum install perl-uri” (which might tell you that “perl-uri” is not available), or to run the command “yum clean all” (hoping to clear some outdated cache), or to start fiddling with the repositories and their settings in /etc/yum.repos.d (hoping that the machine was configured incorrectly). You might also consider just manually downloading and installing perl-uri. In my case, however, the simple problem was that yum was being prevented from doing anything with perl-related packages. The top of the main yum configuration file at /etc/yum.conf was:

[main]
exclude=apache* bind-chroot courier* dovecot* exim* httpd* mod_ssl* mysql* nsd* perl* php* proftpd* pure-ftpd* ruby* spamassassin* squirrelmail*

Presumably, this is a security measure to prevent people from messing with key applications. If you know what you’re doing and you just want to install the Subversion client, temporarily remove perl* from the exclude list!

Acer laptop: Vista or Windows 7 screen brightness resets upon every boot

I recently dealt with a problem on an Acer laptop running Windows Vista, whereby every time the notebook was restarted, the screen was very dark. The user had to manually increase the brightness level every time (Windows button aka Start Menu button + arrow keys; or Function key + one of the F1-F12 keys; or even Windows button + x to bring up the Windows Mobility Center). Since adjusting the brightness still worked, this seemed to indicate that there was nothing physically wrong with the machine. But Windows was somehow storing a default brightness setting and always reverting back to it. On-the-fly adjustment of brightness was only temporary.

As it turns out, the default brightness setting was stored in Power Options, which enable you to define a different set of computer options to balance energy efficiency and performance. Of course, screen brightness is a big component of this. To get at these options, click the battery icon in the status bar, then click either “Adjust screen brightness” or “More power options”.

Power Options menu in the status bar

This should bring up a listing of power plans, on which you can click “Change plan settings”. From there, you can adjust the default brightness.

Adjusting the brightness for one of the power plans

In the particular case that I was looking at, the brightness slider was all the way to the left. We have no idea how that brightness setting had been turned down to nothing in the first place, but restoring a more reasonable base setting fixed the issue upon subsequent reboots.

This is not limited to Acer computers. If you’re using an HP, Sony, Toshiba, Dell, Asus… basically any computer running Windows, you’ll find similar power options, although such computers might have their own power utility that override the default Windows power options.