Arrow

Posts on this site are never sponsored.

Modo car co-op review in New Westminster: convenient car sharing

I’ve been interested in car sharing programs for quite a while as a second car option (if not eventually a primary car option!). The promise is that they provide the convenience of a car without the costs and hassle of actually owning one. However, outside of Vancouver itself, there are very limited options in Metro Vancouver. After moving to New Westminster, I discovered that Modo operates here (and is the only car sharing company that does); as of the time of this post, there are 11 vehicles in New Westminster, including 3 at the Quay and 1 outside of the Columbia SkyTrain station.

I decided to try Modo. It was easy to sign up, easy to book a car, and pretty fun, too.

All but 2 of the Modo cars in New Westminster are a 2012 model year or newer. The older ones are a 2011 Prius and a 2009 Dodge Caravan. They are all sedan or hatchback sizes except for the Caravan and a RAV4.

To join Modo, you have to pay a $20 application fee. Then you can choose 1 of 2 models:

  • pay a refundable $500 buy-in fee to become an owner, then for actual usage pay $4 per hour + mileage (40 cents per kilometre for the first 40km, then 20 cents thereafter); or
  • pay $5 per month as a standard member, then for actual usage pay $8 per hour with the first 200 kilometres free

(There are a few more differences in the different membership models, which you can find out more about on the Modo website.)

Gas is included in the cost, as are Golden Ears and Port Mann bridge tolls. You are expected to fill up the tank past 1/4 full at all times, although you use a Modo credit card, which is included in a pouch next to the steering wheel:

Modo pouch for the car keys and gas card

You pick up your car from a designated spot and have to return it to that same spot when you are done.

You don’t have to worry about car insurance or maintenance. If you pay for your bookings with a credit card that has collision damage insurance for rentals, that coverage is valid for Modo bookings as well. Otherwise you can pay into a damage insurance pool, which is currently $39 per year.

Extra note: I was surprised to find out that you can take a Modo car to the USA.

Here is a brief summary of my experience when registering for a Modo membership, as well as making my first booking:

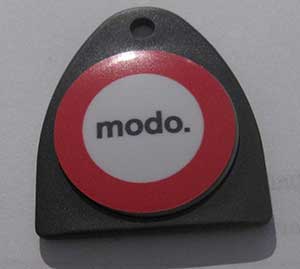
The application process was done (almost) entirely online. After completing the application, I had to call ICBC to get them to e-mail my driving record to Modo. After that, it took exactly 1 week for my Modo fob to arrive in the mail:

Your key (fob) to all Modo cars

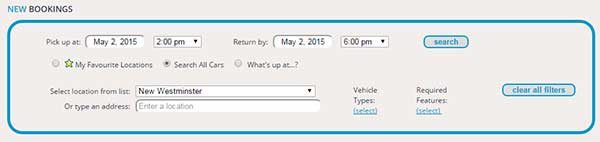
Once I had my fob, I signed in to the Modo website to search for available cars for a specific time period and location:

Enter your location and dates to search for a Modo car

Select from the available cars and times

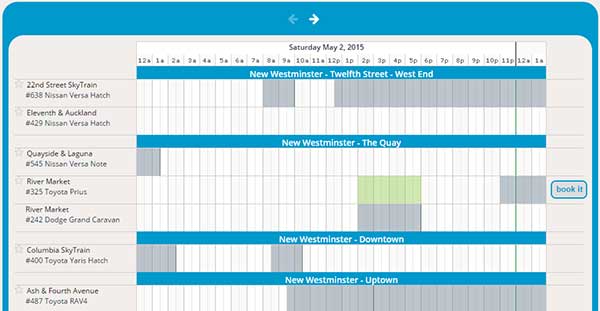
I was able to view information about each car and see a map showing where to pick up the car:

Information about the car

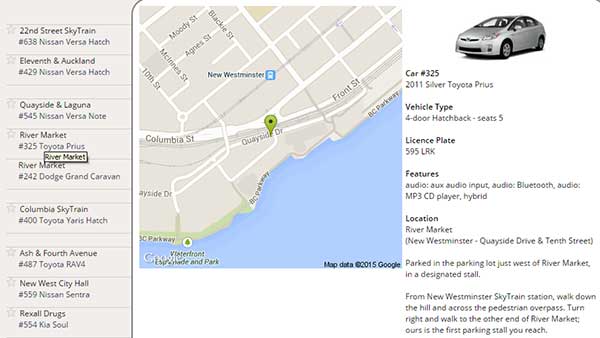
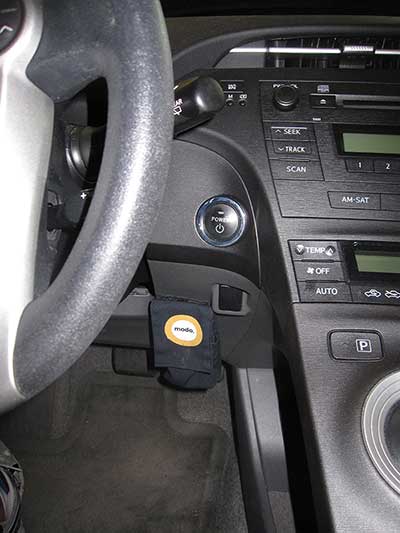
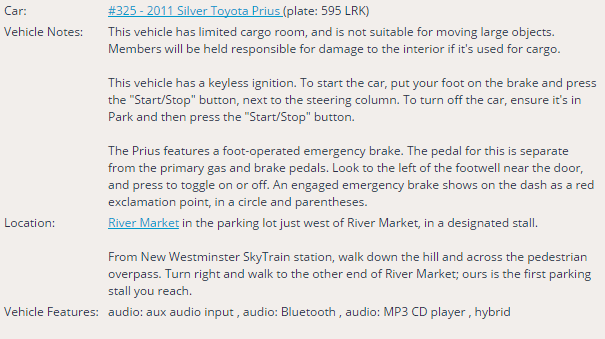
Once I’d selected a car and time period, I could view additional information about the car, such as special operating instructions for a hybrid car. (There are no keys, and to power it on there is a… Power button!)

Special instructions about the car

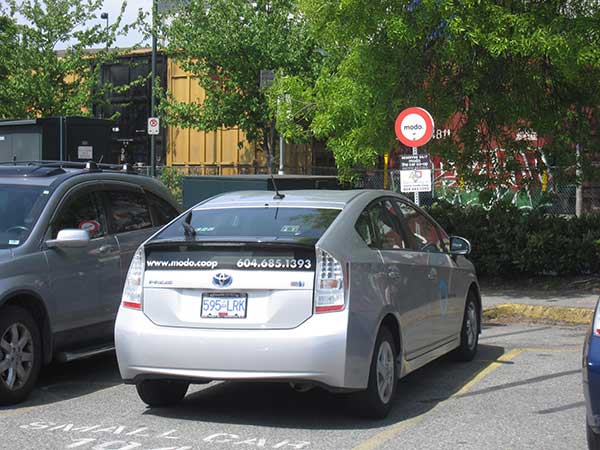
When the time came to pick up the car, I walked over to the location and there was the Prius, in a dedicated Modo parking spot:

Designated Modo parking spot

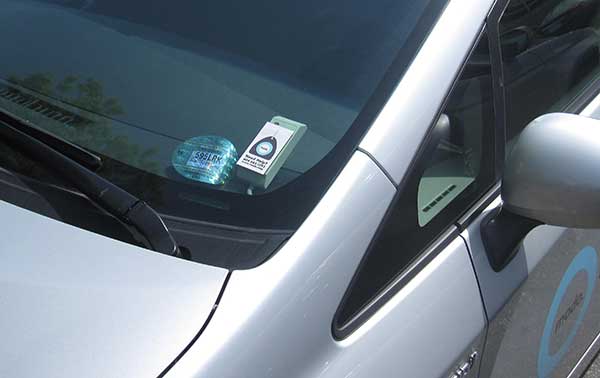
Using my fob, I waved it over the sensor on the dashboard and the car automatically unlocked. To lock the car (and disable the engine) at any of my stops, I waved the fob over the sensor once again.

Fob in to unlock the car and enable the engine

I thought I had plenty of time to return the car, but I ended up being stuck behind a train for 15 minutes. (Tip in New Westminster: if you’re returning a car to the Quay, consider using the overpass at Quayside and Carnarvon, as you might get stuck at Front and Begbie!) I called Modo to tell them about this. Thankfully the next booking wasn’t for another 30 minutes, so they extended my booking by the extra half hour, which cost me an extra $4 instead of having to pay the $25 late fee.

I then parked the car back in the same parking stall, “fobbed out”, and walked home.

I can definitely recommend Modo. If you think it might suit your needs, you can essentially try it out by choosing the monthly $5 membership option. You can of course do your own calculations to figure out whether a car sharing service makes sense for you, whether Modo is the best option compared to the competition (such as Zipcar, Car2Go, and Evo), and then within each service, which plan suits your needs.

Extract font information and size from PDFs for free

My company was implementing a tool to auto-generate PDF reports from a web content management system. We needed to extract font information from the design mock-up PDF. While you can extract a list of fonts used in most free PDF readers including Adobe Reader — go to File > Document Properties > Fonts — we needed the font sizes and the exact places where each font was used.

With the paid Adobe Acrobat Professional you can edit text, view specific font information, and a lot more, but since we only needed very specific functionality, we looked for a free solution first.

There are apparenty quite a few free command line tools that can extract font information, but ones with a graphical user interface were harder to find. I stumbled upon PDF-XChange Editor: PDF-XChange Editor’s full version can be purchased for $43.50 US (which warrants a good look if you need its more advanced features). Its free version allows you to use the “Edit Content Tool” where you can not only edit text, but get the font and font size information:

Edit Content Tool in PDF-Xchange Editor

This was exactly what we needed.

You can also annotate the document, which enabled us to quickly make some nice QA documentation on the font information:

Edit Content Tool in PDF-Xchange Editor

The only downside to PDF-Xchange for the purposes of extracting font information is that it is only available on Windows operating systems.

Extra note: check out wkhtmltopdf if you need a command line tool to convert HTML5 to PDF!

Apache rewrite rule: conditionally strip HTTP header

With mod_headers, you can set, unset, and modify HTTP headers in Apache.

To conditionally set / unset a header, you have to do a bit of a roundabout process and make use of environment variables. In other words, you have to do a test for the condition and set an environment variable based on the result. Then, you can use a RequestHeader directive based on the environment variable.

In this specific example, I wanted to strip an X-Forwarded-Host header only for a specific subdomain. This is because the subdomain was being used to proof the site through a proxy, but I didn’t want the content management system (CMS) behind it to generate links based on the subdomain; I wanted the CMS to generate links based on the normal site domain / URL.

RewriteCond %{HTTP:X-FORWARDED-HOST} proof.yoursite.com [NC]
RewriteRule ^.*$ - [ENV=ISPROOFSITE:true]
RequestHeader unset X-Forwarded-Host env=ISPROOFSITE

You can do something similar with the mod_setenvif Apache module together with the mod_headers module.

SetEnvIf X-Forwarded-Host proof\.yoursite\.com ISPROOFREQUEST
RequestHeader unset X-Forwarded-Host env=ISPROOFSITE

Bonus notes: here’s an example of how to block traffic based on an X-Forwarded-For header. This is useful if you are behind a reverse proxy such as Akamai or Varnish and you cannot block the source IP directly (since the source IP is of the reverse proxy); in these cases, usually you have an X-Forwarded-For or True-Client-IP HTTP header that represents the end client’s IP address.

RewriteCond %{HTTP:X-Forwarded-For}i 123\.127\.77\.38 [OR]
RewriteCond %{HTTP:X-Forwarded-For}i 124\.127\.45\.59 [OR]
RewriteCond %{HTTP:X-Forwarded-For}i 87\.164\.134\.73
RewriteRule ^(.*) - [F]

Transferring a dual-boot hard drive to an SSD (Samsung Evo 840)

When I upgraded my standard “spinning disk” hard drive to an SSD, I didn’t want to have to re-install the operating systems and all of the applications. The particular SSD I bought (Samsung Evo 840) came with a specific application aptly called “Samsung Data Migration” for transferring all of the data. It has very straightforward steps, enabling you to size the partitions on the new drive based on the existing partitions on the old drive and of course copy the data. In my case, I had a dual-boot setup with Windows 7 and Ubuntu but Samsung Data Migration did not recognize the Ubuntu partition. It only recognized the Windows 7 partitions.

I had previously used a program called DriveImage XML to migrate data from an old to a new hard drive with good success. However, it had the same problem in that it did not show the Ubuntu partition.

I ended up successfully using another program called Clonezilla. It is a free and open source program that runs a bit differently than Samsung Data Migration or DriveImage XML. With Clonezilla, you have to burn it onto a bootable CD/DVD or make a bootable USB drive. Then, you reboot your computer and the Clonezilla distribution / operating system will do a live boot on the CD/DVD or USB drive. (There is another option: you can also put Clonezilla on the new hard drive so that you don’t need a separate disk or USB device.) Clonezilla recognized all of my hard drive partitions and successfully copied both the Windows 7 and Ubuntu operating systems to my new hard drive (which I’d plugged in to the computer via a USB hard drive enclosure). Once the copy is complete, you can turn off your computer, physically install the new drive in place of the old drive, and you’re done!

Clonezilla is much more powerful than the Samsung Data Migration program but definitely less user-friendly. However, Clonezilla is very well documented on its website, and not just for the setup process. For example, there is step-by-step documentation for the disk-to-disk clone, complete with screenshots.

CanadianForex review: great foreign exchange rates and support

I’ve been using XE Trade for a few years for personal currency exchange and international funds transfers for my small business. I started to try CanadianForex a few months ago and have been very pleased with its rates and support.

The basic premise is relatively straightforward and the same as XE Trade: you submit currency exchange deals through their online interface, send them the money in the source currency, and they deliver the money in the destination currency to your account or a foreign account within a few days. Therefore, you can use it for currency exchanges between your own accounts, or to send money internationally (as long as it’s between different currencies). Especially for sending money internationally on a regular basis, using an online service is often much more convenient than a traditional bank.

Here’s my review of CanadianForex, specifically compared against XE Trade.

Setup

Creating an account at CanadianForex is very straightforward, although just like XE Trade, you have to provide (for a business account, at least) some sensitive information to them, including:

  • A signed bank statement
  • A client agreement form signed by 2 directors
  • A copy of your driver’s licence

Exchange rates

I’ve found CanadianForex’s exchange rates to be better than XE Trade, at least for transferring between Canadian dollars and: US dollars, Euros, and Australian dollars. CanadianForex’s standard fee is $15 for transactions under $10,000 (and no fees for transactions above $10,000); while XE Trade usually charges no fees at all, CanadianForex is still better (as of January 2015) by a significant amount for trades that are more than a few hundred dollars.

Some example comparisons between CanadianForex and XE Trade after deducting the CanadianForex fee:

  • Sending approximately $5,500 CAD to Australia (AUD): the recipient got 40 AUD more with CanadianForex
  • Sending approximately $8,000 CAD to Germany (EUR): the recipient got 48 EUR more with CanadianForex
  • Sending approximately $7,000 CAD to the United States (USD): the recipient got 50 USD more with CanadianForex

In the case of sending money to Brazil, CanadianForex still charges the same $15 fee, whereas XE Trade charges an additional $22 wire fee. This resulted in similar savings as above with CanadianForex.

I’ve also found CanadianForex’s exchange rates to be slightly better than RBC’s foreign exchange rates, at least for transferring US dollars to Canadian dollars within my business account. However, the difference was only a few dollars for some of sample amounts I tested.

Process

The trades happen completely online, although you have to speak to a CanadianForex representative over the phone to complete your initial account setup, and you also receive a verification phone call from them after your first trade.

To book a trade, you must first set up recipients, including their bank account information. Then, you get a quote for the exchange you’d like to make, and click a “Finalise” button. If you’ve set up direct debit, the money will be removed from your account by the next business day. Otherwise, you send CanadianForex the money using your bank’s bill payment system. Once CanadianForex receives the money, they will send an Electronic Funds Transfer (EFT) or wire payment, depending on the destination country, to the recipient.

Customer service

You can contact CanadianForex by phone or e-mail. This is the same as with XE Trade. However, CanadianForex really emphasizes personal contact by assigning you a specific account manager (for a business account at least) and making you speak to them so that they can walk you through their services over the phone. With XE Trade you can set up your account and trade for years without ever needing talking to a person, let alone be assigned a specific contact.

I once had an issue when XE Trade mysteriously removed one of my recipient records without notifying me, and refused to tell me why when I phoned them. After I pushed for some explanation over the phone, they promised to follow up and never did. The recipient was eventually re-instated, although I was never notified about this. Of course, there is a chance that this could happen with CanadianForex, but I expect that they would be more communicative and cooperative with me in such a case. And to be fair, the situation with XE Trade might have been an edge case.

Other notes

  • Weekends and holidays: CanadianForex is closed on weekends and holidays. In other words, you can sign in to your account but you cannot submit any trades. This is probably a good thing; with XE Trade I discovered that the exchange rate spread was much worse on weekends and holidays versus normal business days.