Arrow

Posts on this site are never sponsored.

Connectify alternative: sharing Internet connection wirelessly on Windows 7

I’d previously written about Connectify as a way to:

  • Share my home wired-only network to a smart phone / iPad / tablet (since those devices can only connect wirelessly)
  • Share one Internet connection in a hotel or other public network with multiple devices.

I found that Connectify was really easy to use, but on the two computers where I was using it, it caused issues when I tried to hibernate the computer. (The specific issue was that the computer would never fully hibernate, eventually timing out and forcefully cutting the power, leading to “your computer did not start up properly” problems on the next boot!) I think in my case there was a clash with Cisco AnyConnect Secure Mobility Client or Cisco Systems VPN Client.

Thankfully, there is an alternative: Windows 7 has wireless network sharing built in and it is quite easy to use as well. It has actually been a feature since Windows XP (thanks to Tim for bringing this up!), although it has gotten simpler in subsequent versions.

Here is how to share your Internet connection wirelessly in Windows 7:

1. Ensure that your wireless adapter is enabled, either via a physical button on your computer or in the network adapter settings in Windows

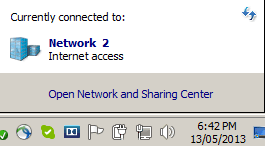
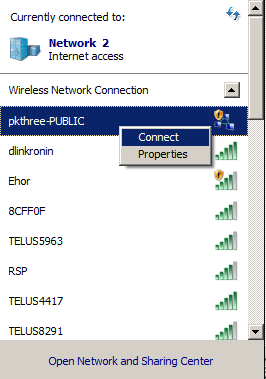
2. Open the Network and Sharing Center from the control panel or the pop-up menu from the taskbar’s connection icon

Open network and sharing center

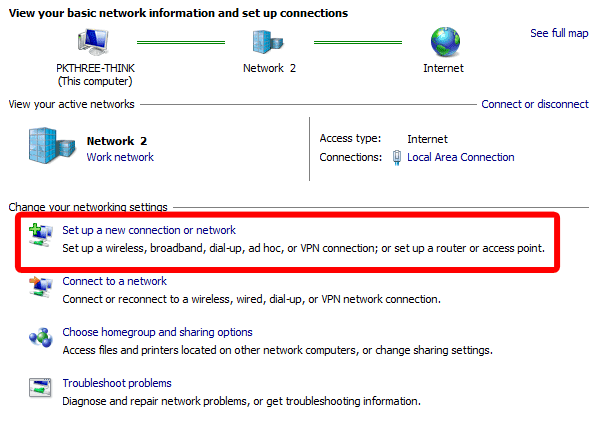
3. Click “Set up a new connection or network”

Set up a new connection or network

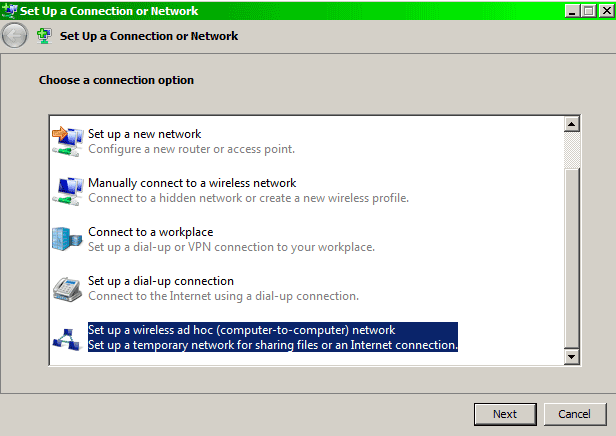
4. Select “Set up a wireless ad hoc (computer-to-computer) network. If this is not an option, go back to step 1!

Choose connection option

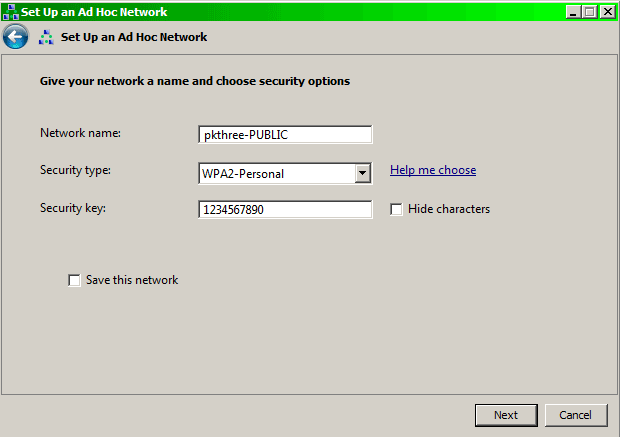
5. Click “Next” a couple of times and then fill in the information for your new wireless connection (network name, security details if desired)

Ad hoc network details

6. Once the connection is created, you’ll see it in your list of available wireless networks. Right click it and “Connect” to it to enable it. (This means that other devices should be able to find it and connect to it.) Disconnect from it from your computer to disable it.

Enable wireless network

How to disable WebEx call-back feature

My company uses WebEx a lot for screen sharing and conference calls. When we first had a WebEx account, we quickly learned how fast the costs added up when offering a toll-free call-in number. Enabling that feature always occurred by accident when creating a new meeting. At 12 cents per minute (or possibly more at the time) per participant, a few calls with a few participants using the toll-free number could triple the normal monthly fee. We soon disabled that feature account-wide — it was an unnecessary feature since participants could connect via VoIP or use much cheaper or free long-distance calling to a US number.

Recently WebEx enabled the “call-back” feature by default on our account. This meant that when we selected the normal “WebEx Audio” conference type, participants were offered the option to have WebEx call their number in order to join the meeting.

WebEx audio conference settings

This was a similarly unnecessary feature and extra cost. This time, however, I couldn’t figure out where to disable the feature in the usual account settings, nor could I locate any information about it in WebEx’s online documentation. Eventually I contacted their support team and got this answer, which is still undocumented from what I can tell:

Follow the steps below to disable call-back feature on your WebEx site/host account:
1. Log in to your WebEx Site Administration page. https://[your_account_name].webex.com/admin
2. Click the Edit User List link on the left-hand side of the page.
3. Enter your search criteria into the User name: or Email: field, then click the Search button.
4. Click the name of the account that needs to be modified.
5. Scroll down to the Telephony privilege: section.
6. To disable call-back, uncheck the Call-back teleconferencing box.
7. Scroll to the bottom of the page, then click the Update button.

Editing WebEx telephony privileges

In other words, there isn’t an account-wide setting for this, but you can disable the call-back feature by editing each individual account user’s settings.

Google Play / YouTube Canadian online movie rental review

Almost 5 years ago, I discovered iTunes online movie rentals and it seemed like a revolutionary new way to rent movies. For a comparable cost to in-store rentals ($4 or $5) you could stream a good quality (standard or high definition) movie without having to go to the store or return the DVD. (As a side note, if you live near a rental kiosk like QUICKflick, you can rent a movie for $2 or $3!) Nowadays, retail movie rental stores are almost extinct, and there are many more online options.

Before I cancelled my cable TV subscription completely, I had Telus TV, which I found was the most convenient way to rent movies directly through the TV without having to worry about lag issues. If you currently have Telus TV, I would recommend checking that out.

As someone who doesn’t have a Wii, Xbox, or other intermediate movie rental device, I’m back to renting movies on the computer and connecting it to my TV. In addition to iTunes, website options now include CinemaNow, Cineplex, and Google Play (which I prefer to incorrectly just call “YouTube Movies”). If you’re not as interested in new releases, you could also consider subscribing to Netflix. CinemaNow, Cineplex, and Google Play all cost about the same amount as iTunes, and sadly the price hasn’t improved over the past 5 years: $4 to $5 for most movies. I haven’t tried CinemaNow yet, but I have tried Cineplex and found the streaming reliability to be mediocre. You might consider trying Cineplex if you want to earn SCENE points.

As for Google Play, renting is incredibly straightforward. An advantage over iTunes is that you don’t have to use any special software — it streams in your browser just like a normal YouTube video.

Step 1 is to pick the movie and select standard or high definition.

Google Play rental step 1

Step 2 is to use Google Wallet to pay with a credit card.

Google Play rental step 2

Once you’ve paid for the rental, you can start streaming it at any time within the next 30 days. Once you’ve “hit play” you have 48 hours to finish watching it. This is the same policy as iTunes, CinemaNow, and Cineplex.

Selection on Google Play is OK. It appears to have the same new releases as the other online movie rental services, but it’s hit and miss regarding older titles. Of course, if you’re looking for something in particular, you can browse the collection of all of the websites before deciding where to rent from!

Headset adapter: 3.5mm double headphone + microphone jack to single jack

I’m used to laptops and other computers having two sound plugs: one for the microphone and one for the headphones / speakers. Unfortunately, when I got a Lenovo T430s laptop, it came with a unified 3.5mm jack for both audio in and out. When standard headphones are plugged in, audio out works but you have to rely on the internal laptop microphone.

I already had a couple of headsets that I liked and didn’t want to purchase new ones. However, an adapter to convert dual audio jacks to a single audio jack was surprisingly difficult to find in stores. The only place I could find that sold such a converter was online. It’s marketed as a “smartphone” adapter. At about $16 US including shipping it was well worth it. It works exactly as advertised, and the plugs are very sturdy. There also appears to be a Canadian online store for the same product.

Adapter for 3.5mm headphone + microphone jacks to unified jack

This problem could have probably been avoided if I had a USB headset to start, but there are advantages to having a standard analog 3.5mm plug, such as being able to re-use the headset for other devices such as an MP3 player.

Non short code TransLink Next Bus

TransLink, the Metro Vancouver transit authority, has run a very popular Next Bus service since 2007. In short, you send a text message with the number of the bus stop you are at to the 33333 short code and you get a text message back to tell you when the next buses will arrive. My friends have found it very useful but I’ve actually never directly used it because my cell phone service provider has never supported short codes.

Wind Mobile, Mobilicity, Speak Out Wireless, Petro Canada, Chatr, and other smaller wireless service providers either do not support short codes or charge extra to use them (on top of your normal SMS plan). TransLink has been repeatedly asked to provide a non short code access number to Next Bus but they say they have no plans to provide one. As an alternative, they do have a useful mobile site, but of course not everybody has a data plan.

I can understand that 33333 is incredibly easy to remember, but it is not entirely necessary if repeat users can store a normal phone number in their contact list. Also, it doesn’t provide any cross-regional advantage (that is, the ability to send an SMS to one number even if you’re in a different area code) if all of its users are in the same area. Adding a normal phone number should be quite cheap for TransLink to do (especially compared to monthly short code fees), since their back-end is already set up.

I’ve set up a phone number — xxx-xxx-xxxx — to provide such access. It acts like any normal number, so if you are on a pay as you go service, you will be charged for a normal text message, and if you have an unlimited texting plan, it should be free.

How it works:

Send a text message containing the 5-digit stop number and get a response such as this:

[112] 8:46am* 9:01am* 9:16am* [116] 9:02am- 9:28am 9:58am*

Send a text message containing the 5-digit stop number and a bus route number (example: 52606 112) and get a similar response but only for that bus:

[112] 8:46am* 9:01am* 9:16am*

The estimated time might be appended with one of the following characters:

* indicates scheduled time
- indicates delay
+ indicates bus is running ahead of schedule
C indicates bus or stop is cancelled

I’ve tested those two use cases, but I cannot provide any official guarantees, and if you find any problems with it, let me know!

Although I find the Next Bus idea in general to be smart and complex, there is nothing particularly smart or complex about how my service is built: it uses the free TransLink API and the Tropo SMS service (which costs me a few cents per message).

If many people start to use the phone number I’ve provided, the usage will cost me more money than I can afford. Hopefully TransLink will add its own normal phone number or some generous donor can step in before that happens!

Update: My company Mugo Web is now backing this service.
Update: You can now call the same number and get bus schedules via voice. See this page for more information.
January 2, 2018 update After 4 years and thousands of users, my company has decided to stop providing this service. We contacted TransLink to give them the code behind it, but did not receive a response.